Intrusion policies are defined sets of intrusion detection and prevention configurations that inspect traffic for security violations and, in inline deployments, can block or alter malicious traffic. Intrusion policies are invoked by your access control policy and are the system’s last line of defense before traffic is allowed to its destination.
At the heart of each intrusion policy are the intrusion rules. An enabled rule causes the system to generate intrusion events for (and optionally block) traffic matching the rule. Disabling a rule stops processing of the rule.
The Firepower System delivers several base intrusion policies, which enable you to take advantage of the experience of the Cisco Talos Security Intelligence and Research Group (Talos). For these policies, Talos sets intrusion and preprocessor rule states (enabled or disabled), as well as provides the initial configurations for other advanced settings.
If you create a custom intrusion policy, you can:
* Tune detection by enabling and disabling rules, as well as by writing and adding your own rules.
* Use Firepower recommendations to associate the operating systems, servers, and client application protocols detected on your network with rules specifically written to protect those assets.
* Configure various advanced settings such as external alerting, sensitive data preprocessing, and global rule thresholding.
* Use layers as building blocks to efficiently manage multiple intrusion policies.
In an inline deployment, an intrusion policy can block and modify traffic:
* Drop rules can drop matching packets and generate intrusion events. To configure an intrusion or preprocessor drop rule, set its state to Drop and Generate Events.
* Intrusion rules can use the replace keyword to replace malicious content.
For intrusion rules to affect traffic, you must correctly configure drop rules and rules that replace content, as well as well as correctly deploy managed devices inline, that is, with inline interface sets. Finally, you must enable the intrusion policy’s drop behavior, or Drop when Inline setting.
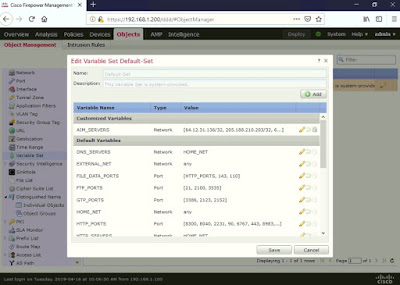
You can view the default Variable Set Objects used by FMC IPS Rules under Objects > Variable Set > click edit (pencil icon).

To create an Intrusion Policy in FMC, go to Policies > Access Control > Intrusion > click Create Policy.


The Security Over Connectivity Base Policy has 14,988 enabled rules.


This is editing Manage Rules.

Click <Back or the Warning icon (yellow triangle beside Policy Information) > click Commit Changes.

A Description of Changes box will appear > optionally type a description > click OK.

Similar to the File Policy Rule, apply the Intrusion Policy Rule under the main Access Control Policy (ACP) Rule, go to Policies > Access Control.

Click edit (pencil icon).

You can either click edit (pencil icon) or the Intrusion Policy icon (shield icon). I edited my ACP Rule #10 (LAB_WEB) where I applied the File Policy.

In order to simulate and capture an IPS rule event, I changed the Applications and Ports to Any.


If you click on the Intrusion Policy (shield icon) in will re-direct you to Inspection tab > under Intrusion Policy > select from the drop-down option the Intrusion Policy created earlier (LAB-INTRUSION-POLICY).


Click Save (beside Cancel) and Deploy (beside green check icon).

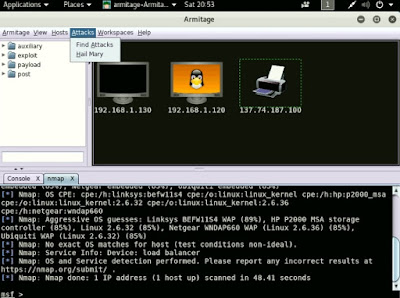
I tried simple ICMP and DNS attacks but wasn't successful. So I used Armitage instead, which is an attack tool included in Kali Linux.
Launch Armitage > Hosts > Nmap Scan > Quick Scan (OS detect).


You can use a public hacking site to simulate an attack.
It's good practice to simulate in a lab environment as it may trigger a firewall or IPS rule or disrupt services running on a server in a production environment.

Let the Nmap Scan run for a couple of minutes.

Click on a host > Attacks > Find Attacks

You can either launch individual exploits or a barrage of attacks by clicking on a host > Attacks > Hail Mary

Click Yes to confirm.


To view Intrusion Event Logs, go to Analysis > Intrusion >Events.

Click Table View of Events.


Click (tick) on the Intrusion Event Log > click View.


At the heart of each intrusion policy are the intrusion rules. An enabled rule causes the system to generate intrusion events for (and optionally block) traffic matching the rule. Disabling a rule stops processing of the rule.
The Firepower System delivers several base intrusion policies, which enable you to take advantage of the experience of the Cisco Talos Security Intelligence and Research Group (Talos). For these policies, Talos sets intrusion and preprocessor rule states (enabled or disabled), as well as provides the initial configurations for other advanced settings.
If you create a custom intrusion policy, you can:
* Tune detection by enabling and disabling rules, as well as by writing and adding your own rules.
* Use Firepower recommendations to associate the operating systems, servers, and client application protocols detected on your network with rules specifically written to protect those assets.
* Configure various advanced settings such as external alerting, sensitive data preprocessing, and global rule thresholding.
* Use layers as building blocks to efficiently manage multiple intrusion policies.
In an inline deployment, an intrusion policy can block and modify traffic:
* Drop rules can drop matching packets and generate intrusion events. To configure an intrusion or preprocessor drop rule, set its state to Drop and Generate Events.
* Intrusion rules can use the replace keyword to replace malicious content.
For intrusion rules to affect traffic, you must correctly configure drop rules and rules that replace content, as well as well as correctly deploy managed devices inline, that is, with inline interface sets. Finally, you must enable the intrusion policy’s drop behavior, or Drop when Inline setting.
You can view the default Variable Set Objects used by FMC IPS Rules under Objects > Variable Set > click edit (pencil icon).


To create an Intrusion Policy in FMC, go to Policies > Access Control > Intrusion > click Create Policy.

Type a Name > leave the default for Drop when
Inline (ticked) > select a Base Policy.
The Base Policy have different sets of
pre-configured IPS rules depending on the level of security and performance (the more IPS rule the more CPU and memory needed). In this case I chose Security
Over Connectivity.


The Security Over Connectivity Base Policy has 14,988 enabled rules.

You can
modify the Intrusion Policy by clicking edit (pencil icon).
This is
editing the Manage Base Policy.

This is editing Manage Rules.

Click <Back or the Warning icon (yellow triangle beside Policy Information) > click Commit Changes.

A Description of Changes box will appear > optionally type a description > click OK.

Similar to the File Policy Rule, apply the Intrusion Policy Rule under the main Access Control Policy (ACP) Rule, go to Policies > Access Control.

Click edit (pencil icon).

You can either click edit (pencil icon) or the Intrusion Policy icon (shield icon). I edited my ACP Rule #10 (LAB_WEB) where I applied the File Policy.

In order to simulate and capture an IPS rule event, I changed the Applications and Ports to Any.


If you click on the Intrusion Policy (shield icon) in will re-direct you to Inspection tab > under Intrusion Policy > select from the drop-down option the Intrusion Policy created earlier (LAB-INTRUSION-POLICY).

Notice
the Intrusion Policy is now enabled or highlighted (shield icon turned yellow).

Click Save (beside Cancel) and Deploy (beside green check icon).

I tried simple ICMP and DNS attacks but wasn't successful. So I used Armitage instead, which is an attack tool included in Kali Linux.
Launch Armitage > Hosts > Nmap Scan > Quick Scan (OS detect).


You can use a public hacking site to simulate an attack.
It's good practice to simulate in a lab environment as it may trigger a firewall or IPS rule or disrupt services running on a server in a production environment.

Let the Nmap Scan run for a couple of minutes.

Click on a host > Attacks > Find Attacks

You can either launch individual exploits or a barrage of attacks by clicking on a host > Attacks > Hail Mary

Click Yes to confirm.


To view
Intrusion Event Logs, go to Analysis >
Connections > Events. I clicked on the Initiator
IP of 192.168.1.110 (Kali Linux VM) to filter.
Notice a
Reason of Intrusion Block.

To view Intrusion Event Logs, go to Analysis > Intrusion >Events.

Click Table View of Events.


Click (tick) on the Intrusion Event Log > click View.


No comments:
Post a Comment