Before you can manage a Firepower System device, you must set up a two-way, SSL-encrypted communication channel between the device and the Firepower Management Center. The appliances use the channel to share configuration and event information. High availability peers also use the channel, which is by default on port 8305/tcp.
To enable communications between two appliances, you must provide a way for the appliances to recognize each other. There are three criteria the Firepower System uses when allowing communications:
* The hostname or IP address of the appliance with which you are trying to establish communication.
* In NAT environments, even if the other appliance does not have a routable address, you must provide a hostname or an IP address either when you are configuring remote management, or when you are adding the managed appliance.
* A self-generated alphanumeric registration key up to 37 characters in length that identifies the connection.
* An optional unique alphanumeric NAT ID that can help the Firepower System establish communications in a NAT environment.
* The NAT ID must be unique among all NAT IDs used to register managed appliances.
Connect to the FirePOWER module CLI using the session sfr ASA privilege exec command.
ASA5506W-X# session sfr
To add a device in FMC, go to Devices > Device Management > Add.

You can optionally create a Group if managing several devices.

Fill in the device info and create a dummy policy in order to complete the device registration. Skip the Unique ID if the FMC is not behind any NAT device.

Temporarily create a new Policy (if this is the initial device added) > select Note for Base Policy > click Network Discovery > Save.

Once you tick Protection license, the Control, Malware and URL Filtering will be available (except VPN). Click Register.

Adding the device (or sensor) will take a couple of minutes.

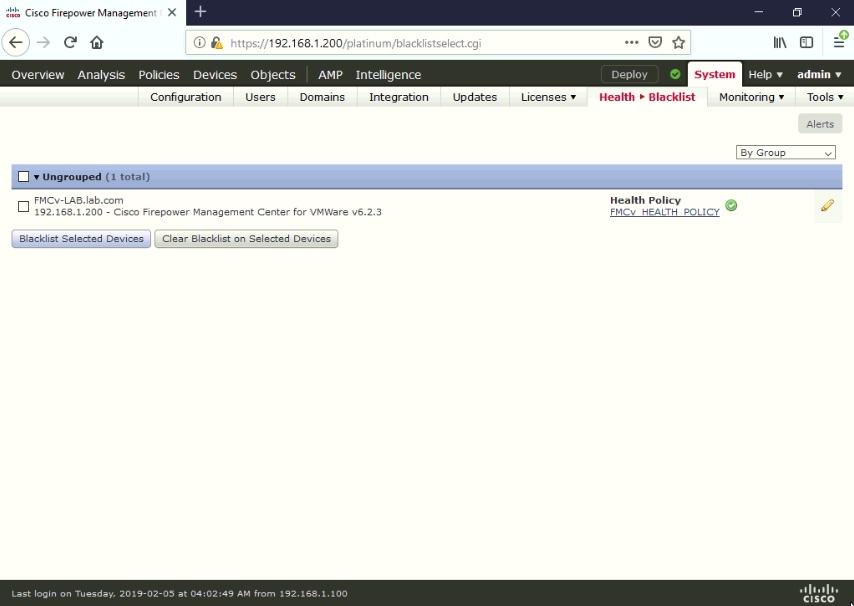
Notice the green check icon which indicates the device was successfully added.


The FMC automatically applied the configured Health Policy to the ASA FirePOWER device (Applied To: 2 appliances). Click on the green check icon (Apply) to verify.


To view device information go to Devices > Device Management > Edit (pencil icon).


If you need to remove the FMC (manager), you can use the configure manager delete command on the FirePOWER module CLI:
> configure manager delete
To enable communications between two appliances, you must provide a way for the appliances to recognize each other. There are three criteria the Firepower System uses when allowing communications:
* The hostname or IP address of the appliance with which you are trying to establish communication.
* In NAT environments, even if the other appliance does not have a routable address, you must provide a hostname or an IP address either when you are configuring remote management, or when you are adding the managed appliance.
* A self-generated alphanumeric registration key up to 37 characters in length that identifies the connection.
* An optional unique alphanumeric NAT ID that can help the Firepower System establish communications in a NAT environment.
* The NAT ID must be unique among all NAT IDs used to register managed appliances.
Connect to the FirePOWER module CLI using the session sfr ASA privilege exec command.
ASA5506W-X# session sfr
Opening
command session with module sfr.
Connected
to module sfr. Escape character sequence is 'CTRL-^X'.
ASA5506X-FP
login: admin
Password:
Last
login: Tue Nov 20 05:14:43 UTC 2018 on ttyS1
Copyright
2004-2018, Cisco and/or its affiliates. All rights reserved.
Cisco is
a registered trademark of Cisco Systems, Inc.
All other
trademarks are property of their respective owners.
Cisco
Fire Linux OS v6.2.3 (build 13)
Cisco
ASA5506W v6.2.3 (build 83)
Last
login: Tue Mar 12 08:01:01 UTC 2019 on cron
>
system support ping 192.168.1.200 // VERIFY CONNECTIVITY TO FMC
Last
login: Tue Mar 12 08:32:17 UTC 2019 on pts/0
PING
192.168.1.200 (192.168.1.200) 56(84) bytes of data.
64 bytes
from 192.168.1.200: icmp_req=1 ttl=64 time=4.42 ms
64 bytes
from 192.168.1.200: icmp_req=2 ttl=64 time=0.998 ms
64 bytes
from 192.168.1.200: icmp_req=3 ttl=64 time=1.03 ms
64 bytes
from 192.168.1.200: icmp_req=4 ttl=64 time=0.996 ms
64 bytes
from 192.168.1.200: icmp_req=5 ttl=64 time=3.78 ms
^C
---
192.168.1.200 ping statistics ---
5 packets
transmitted, 5 received, 0% packet loss, time 4004ms
rtt
min/avg/max/mdev = 0.996/2.247/4.420/1.528 ms
> configure manager add 192.168.1.200 cisco // ADD FMC IP; USE THE SAME REGISTRATION KEY ON FMC
Manager
successfully configured.
Please
make note of reg_key as this will be required while adding Device in FMC.
> show
managers
Host : 192.168.1.200
Registration
Key : ****
Registration : pending
RPC
Status :
To add a device in FMC, go to Devices > Device Management > Add.

You can optionally create a Group if managing several devices.

Fill in the device info and create a dummy policy in order to complete the device registration. Skip the Unique ID if the FMC is not behind any NAT device.

Temporarily create a new Policy (if this is the initial device added) > select Note for Base Policy > click Network Discovery > Save.

Once you tick Protection license, the Control, Malware and URL Filtering will be available (except VPN). Click Register.

Adding the device (or sensor) will take a couple of minutes.

Notice the green check icon which indicates the device was successfully added.

You can
verify the ASA FirePOWER registration status using the show managers command.
> show
managers
Type : Manager
Host : 192.168.1.200
Registration : Completed
To check
if Health Policy is applied to the ASA FirePOWER device, go to Health > Policy.

The FMC automatically applied the configured Health Policy to the ASA FirePOWER device (Applied To: 2 appliances). Click on the green check icon (Apply) to verify.


To view device information go to Devices > Device Management > Edit (pencil icon).


If you need to remove the FMC (manager), you can use the configure manager delete command on the FirePOWER module CLI:
> configure manager delete
> show
managers
No managers configured.