The Palo Alto Networks (PAN) URL filtering solution compliments App-ID by enabling you to configure the firewall to identify and control access to web (HTTP and HTTPS) traffic and to protect your network from attack.
With URL Filtering enabled, all web traffic is compared against the URL filtering database, which contains a listing of millions of websites that have been categorized into approximately 60-80 categories. You can use these URL categories as a match criteria in policies (Captive Portal, Decryption, Security, and QoS) or attach them as URL filtering profiles in security policy, to safely enable web access and control the traffic that traverses your network.
Antivirus profiles protect against viruses, worms, and trojans as well as spyware downloads. Using a stream-based malware prevention engine, which inspects traffic the moment the first packet is received, the Palo Alto Networks antivirus solution can provide protection for clients without significantly impacting the performance of the firewall. This profile scans for a wide variety of malware in executables, PDF files, HTML and JavaScript viruses, including support for scanning inside compressed files and data encoding schemes. If you have enabled Decryption on the firewall, the profile also enables scanning of decrypted content.

Click Yes to continue. It's best practice to perform any PAN updates on a change window.

Select a region (APAC) to download the update file from a server near your country/region.


It took less than a minute to finish downloading the PAN-DB.

Notice the Download Status under PAN-DB URL Filtering is now updated (2019).


Leave the Name selected/highligthed > click OK.

Click default-1 (hyperlink) to edit.


Type/search for streaming-media > change Site Access to block > click OK.


To apply URL Filtering, go to Policy > Security > select Rule #2 (Allow-Any).

Go to Actions tab > Profile Setting > Profile Type: Profiles.

Under URL Filtering > choose BLOCK-SOCIAL-STREAMING created earlier > click OK.

Notice the URL Filtering Profile is enabled under Profile column (shield with globe/www icon).
Click Commit.
I tried visiting some popular Social Networking sites such as Facebook and Instagram but got a Web Page Blocked error. Notice the Category: social-networking.


I tried visiting a popular video streaming website such as Youtube but also got a Web Page Blocked error. Notice the Category: streaming-media.

I tried Google and access was allowed.

To monitor URL Filtering logs, go to Monitor > Logs > URL Filtering. Notice the URL Filtering (block-url) for Social Networking sites and Streaming Media.

Click on the magnifying glass icon to get a more Detailed Log View.


You'll also need to perform a Dynamic Update for Antivirus under Device > Dynamic Updates > click Check Now (at the bottom) to retrieve the latest updates.

Notice a new Antivirus update (2019/06/26) became available for Download. Under Action column > click on Download (hyperlink).


Notice the Action changed to Install. Click Install (hyperlink) to install the downloaded Antivirus update.

It only took a minute to complete the Antivirus Install.


Select Name (default) > click OK.

Click on default-1 to edit the new Antivirus Security Profile.

Edit the name (AV-PROFILE-1) > under Antivirus tab > tick Packet Capture > click OK.

Apply the Antivirus Security Profile to a Security Policy, select Rule #1 (Allow-Inside-Out).

Go to Actions tab > Profile Setting > Antivirus > AV-PROFILE-1 > click OK.

Notice under Profile column the Antivirus Profile (AV-PROFILE-1) has been activated (shield icon with a bug/spider).

Click Commit.

To test the configured Antivirus Security Profile, go to eicar.org > click Download.

Click Download (on the left/under INTENDED USE).

Scroll below to download eicar test files. Click the files under protocol http since there's no SSL Decryption configured yet on the PAN Firewall.

I got a Web Page Blocked error after clicking/downloading the eicar.com test file.

The Internet Explorer web browser has a built-in security feature which blocks known virus and malware.


Click the magnifying glass icon for a more Detailed Log View.


With URL Filtering enabled, all web traffic is compared against the URL filtering database, which contains a listing of millions of websites that have been categorized into approximately 60-80 categories. You can use these URL categories as a match criteria in policies (Captive Portal, Decryption, Security, and QoS) or attach them as URL filtering profiles in security policy, to safely enable web access and control the traffic that traverses your network.
Antivirus profiles protect against viruses, worms, and trojans as well as spyware downloads. Using a stream-based malware prevention engine, which inspects traffic the moment the first packet is received, the Palo Alto Networks antivirus solution can provide protection for clients without significantly impacting the performance of the firewall. This profile scans for a wide variety of malware in executables, PDF files, HTML and JavaScript viruses, including support for scanning inside compressed files and data encoding schemes. If you have enabled Decryption on the firewall, the profile also enables scanning of decrypted content.
To enable
URL Filtering, make sure the URL
Filtering License is applied. To verify, go to Device > Licenses > PAN-DB
URL Filtering. Notice the Date Expires: May 19, 2020.
Notice
the PAN URL Category Database is slightly old (dated 2017). Click Re-Download
(hyperlink) to install the latest PAN-DB URL Filtering Categories.

Click Yes to continue. It's best practice to perform any PAN updates on a change window.

Select a region (APAC) to download the update file from a server near your country/region.


It took less than a minute to finish downloading the PAN-DB.

Notice the Download Status under PAN-DB URL Filtering is now updated (2019).

To
configure a URL Filtering policy on a PAN Firewall, go to Objects > Security
Profiles > URL Filtering. There's a URL Filter named default that's
configured by default.
Click on
default > Clone (at the bottom).

Leave the Name selected/highligthed > click OK.

Click default-1 (hyperlink) to edit.

Type a
Name (BLOCK-SOCIAL-STREAMING) > under Categories tab > type/search for
social-networking. Notice the Category is allow.
Click on
allow under Site Access > select block. The User Credential Submission will
automatically change to block. Click OK.

Type/search for streaming-media > change Site Access to block > click OK.


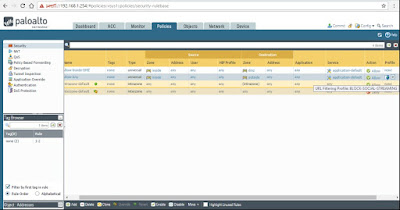
To apply URL Filtering, go to Policy > Security > select Rule #2 (Allow-Any).

Go to Actions tab > Profile Setting > Profile Type: Profiles.

Under URL Filtering > choose BLOCK-SOCIAL-STREAMING created earlier > click OK.

Notice the URL Filtering Profile is enabled under Profile column (shield with globe/www icon).

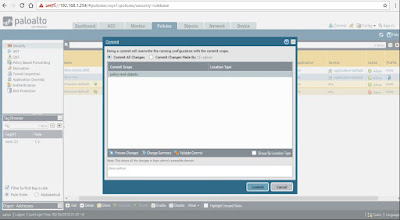
Click Commit.

I tried visiting some popular Social Networking sites such as Facebook and Instagram but got a Web Page Blocked error. Notice the Category: social-networking.


I tried visiting a popular video streaming website such as Youtube but also got a Web Page Blocked error. Notice the Category: streaming-media.

I tried Google and access was allowed.

To monitor URL Filtering logs, go to Monitor > Logs > URL Filtering. Notice the URL Filtering (block-url) for Social Networking sites and Streaming Media.

Click on the magnifying glass icon to get a more Detailed Log View.


To check
for the Antivrus license on a PAN Firewall, go to Device > Licenses >
Threat Prevention.
Notice
the Date Expires: May 14, 2020.

You'll also need to perform a Dynamic Update for Antivirus under Device > Dynamic Updates > click Check Now (at the bottom) to retrieve the latest updates.

Notice a new Antivirus update (2019/06/26) became available for Download. Under Action column > click on Download (hyperlink).


Notice the Action changed to Install. Click Install (hyperlink) to install the downloaded Antivirus update.

It only took a minute to complete the Antivirus Install.


To create
an Antivirus Security Profile under Objects > Security Profiles >
Antivirus. Notice there's a default Antivirus Security Profile configured.
Tick
default > Clone (at the bottom) .

Select Name (default) > click OK.

Click on default-1 to edit the new Antivirus Security Profile.

Edit the name (AV-PROFILE-1) > under Antivirus tab > tick Packet Capture > click OK.

Apply the Antivirus Security Profile to a Security Policy, select Rule #1 (Allow-Inside-Out).

Go to Actions tab > Profile Setting > Antivirus > AV-PROFILE-1 > click OK.

Notice under Profile column the Antivirus Profile (AV-PROFILE-1) has been activated (shield icon with a bug/spider).

Click Commit.

To test the configured Antivirus Security Profile, go to eicar.org > click Download.

Click Download (on the left/under INTENDED USE).

Scroll below to download eicar test files. Click the files under protocol http since there's no SSL Decryption configured yet on the PAN Firewall.

I got a Web Page Blocked error after clicking/downloading the eicar.com test file.

The Internet Explorer web browser has a built-in security feature which blocks known virus and malware.


To
monitor Antivirus threat logs, go to Monitor > URL Filtering.
I
initially didn't see Antivirus threat logs or hits under Logs > Threat. For some
reason, it appeared under URL Filtering.

Click the magnifying glass icon for a more Detailed Log View.

