The Palo Alto Networks (PAN) firewall can be configured and managed locally or it can be managed centrally using Panorama, the Palo Alto Networks centralized security management system. If you have six or more firewalls deployed in your network, use Panorama to achieve the following benefits:
* Reduce the complexity and administrative overhead in managing configuration, policies, software and dynamic content updates. Using device groups and templates on Panorama, you can effectively manage firewall-specific configuration locally on a firewall and enforce shared policies across all firewalls or device groups.
* Aggregate data from all managed firewalls and gain visibility across all the traffic on your network. The Application Command Center (ACC) on Panorama provides a single glass pane for unified reporting across all the firewalls, allowing you to centrally analyze, investigate and report on network traffic, security incidents and administrative modifications.
You must perform these initial configuration tasks either from the MGT interface, even if you do not plan to use this interface for your firewall management, or using a direct serial connection to the console port on the firewall.


To configure the Management Interface IP address, select IP Type:Static > type the IPv4 Address: 192.168.1.254> Netmask: 255.255.255.0 > Default Gateway: 192.168.1.10 > for Network Connectivity Services tick: HTTPS, SSH, Ping.

You can verify the Management interface via CLI command show interface management

To configure DNS on the PAN Firewall, go to Device > Setup > Services > click edit (gear icon).

You configure DNS for Dynamic Updates (Antivirus, WildFire, etc.) and for PAN-OS downloads. Under NTP tab, you can configure an NTP server IP address for synchronized date/time which is very important for logging threats and investigating Cybersecurity incidents.


Click Service Route Configuration (a hyperlink). By default, the PAN Firewall uses the Management Interface for Dynamic Updates and NTP.

If you need to enable a certain Service (HTTP, NTP, NetFlow, etc.) via another PAN Firewall interface, click Customize.


You can also view the current PAN OS version under Device > Software. Notice the Currently Installed column has a check mark for Version 8.0.0

Click Check Now (at the bottom) to list down the latest PAN OS.


Click Upgrade to PAN-OS 8.1

According to the PAN-OS 8.1 upgrade path and since we're on 8.0.0, we'll need to download and install the latest "preferred" PAN-OS 8.0 maintenance before upgrading to 8.1

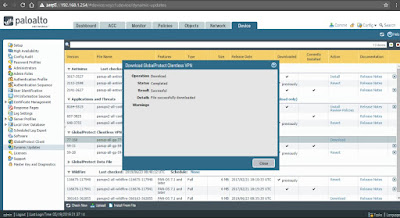
Click Download. This will take several minutes depending on your Internet speed (via Management Interface).

I wasn't able to finish the download and according to the pop-up message Details, I need to Download the PAN-OS 8.1.0 base image first (no need to install).

I first downloaded PAN-OS 8.1.0

I downloaded again PAN-OS 8.1.8

The Install option is now available. Click Install.

It's best practice to create a backup of the current Running Config, go to Device > Setup > Operations > Export > Export named configuration snapshot

Choose Name: running-config.xml from the drop-down option > click OK.

It will download a copy of the running-config (.xml) to your machine. Notice the running-config (.xml) was downloaded (Download folder).

Click Install. There was a pop-up Warning that will ask you to review the PAN-OS 8.1.8 release notes and perform a backup of the PAN firewall configuration.

The PAN-OS 8.1.8 installation failed due to a content version requirement.

To update the PAN firewall Dynamic Updates (Antivirus, WildFire, etc.), go to Device > Dynamic Updates > Check Now to download new Dynamic Updates.


I've downloaded and installed the latest updates for Antivirus, Applications and Threats, GlobalProtect and WildFire.


For the Application and Threats Install, just click Continue Installation.


After the Dynamic Updates were installed, I was able to install the PAN-OS 8.1.8. A reboot is required afterwards. Click Yes to reboot.

I waited for several minutes but it kept on re-connecting to the device. I just opened a new web session and HTTPS again to the PAN Firewall.

A pop-up message will appear saying it's on PAN-OS 8.1

You can verify the current Software Version under Dashboard > Software Version (8.1.8)

Or under Device > Software. Notice 8.1.8 has a check mark under Currently Installed Column.

To configure Layer 3 interface in PAN firewall, go to Network > Interfaces > Ethernet > click a specific ethernet interface.

Select Interface Type: Layer3.

Under Config tab > Virtual Router > New.

Type a Virtual Router Name (VR-1) > click OK.

By default, there's a named Virtual Router called default under Network > Virtual Routers.

Under
Config tab > Security Zone > select New.

Type the Zone Name (outside) > click OK.


Under IPv4 tab > select Static > click Add.

Type the IPv4 address/netmask (203.0.113.20/24) > click OK.

Configure the ethernet interfaces for the inside and DMZ Security Zones according to the network topology. Notice the Link State are gray colored. You'll need to click Commit in order to apply the changes (Candidate Config) to the PAN Firewall's Running Config (a slight difference in the Cisco world).

Click Commit > you can optionally Preview Changes > select the number of Lines of Context > click OK > click Commit again.


You should see a pop-up window to Preview Changes or allow it in your web browser settings if it's being blocked.

The Preview Changes is color coded. Notice the changes for the ethernet interface were highlighted in yellow (Modified).

You can alternatively choose Change Summary option to have a quick look of the changes being made.

Click on Tasks (at the bottom right corner) to view the Status of the changes (Candidate Config) being Committed to the Running Config.

Notice the ethernet interfaces Link State are now green (active) after clicking Commit.

You can also verify via the CLI command show interface all or specify a specific ethernet interface.

To configure a static default route (for Data plane), go to Network > Virtual Router > click VR-1.

Go to Static Routes > IPv4 tab > Add.

Type a Name: STATIC-DEFAULT-ROUTE > Destination: 0.0.0.0/0 (a.k.a quad zero route) > Interface: ethernet1/1 > Next Hop: IP Address > 203.0.113.1 > click OK.

Click OK again > click Commit.


You can view the PAN firewall routing table under Network > Virtual Routers > VR-1 > More Runtime Stats (hyperlink on the far right column) > Routing > Route Table.


Or using the CLI command show routing route

I was able to ping Google DNS 8.8.8.8 (via Management Interface) but ping from the inside source IP 192.168.1.1 wasn't working. This is due to a NAT policy which isn't configured yet.

To configure the NAT policy, go to Policies tab > NAT > Add.

Under General > type a Name (INSIDE-DYNAMIC-NAT)

Go to Original Packet tab > Source Zone > click Add > choose inside.

Under Destination Zone > choose outside.

Go to Translated packet > choose Translation Type: Dynamic IP and Port (NAT overload or PAT in Cisco).


Choose Interface: ethernet1/1.

Type the Translated IP Address (203.0.113.20/24) > click OK.

Click Commit.


Enable logging (Log at Session End) for both intrazone-default and interzone-default Security Policy.

To create a new Security Policy, click Add > under General tab > type a Security Policy Name. Notice the tabs with the wriggly red mark are required fields.

Under
Source tab > Source Zone > select inside.

Under Destination tab > Destination Zone > select outside.

Under Actions tab > Log Setting > tick Log at Session End.

Click
OK > click Commit.

After the Dynamic NAT (IP and port) policy and Security policy were configured, I was able to ping the Internet (Google DNS) sourced from the inside zone 192.16.1.1/24.

To view or monitor traffic, go to Monitor tab > Logs > Traffic. Notice there are traffic generated from inside source 192.168.1.20 to outside destination 8.8.8.8 and hit the Security policy rule SEC-POL-IN-OUT.

Click on the magnifying glass icon to view a more Detailed Log. You can also maximize the output to full screen by clicking the maximize icon on the upper right corner.

You can optionally create Tags (color code) for the Security Zones under Objects > Tags > Add. This is to help admins visually identify the Security Zones if there are multiple Security or NAT policy configured on the PAN firewall.

Select the Security Zone (outside) > choose a color (Red) > click OK.

Create tags for the inside and dmz Security Zones according to the network topology.

Click Commit.

Go to Policies > Security. Notice the Security Zones are now color coded (Tags) to make it easier to identify the Source and Destination Security Zones in troubleshooting a NAT and Security Policy.

Go to Policies > NAT. Notice there are Tags (colors) on the Security Zones.

* Reduce the complexity and administrative overhead in managing configuration, policies, software and dynamic content updates. Using device groups and templates on Panorama, you can effectively manage firewall-specific configuration locally on a firewall and enforce shared policies across all firewalls or device groups.
* Aggregate data from all managed firewalls and gain visibility across all the traffic on your network. The Application Command Center (ACC) on Panorama provides a single glass pane for unified reporting across all the firewalls, allowing you to centrally analyze, investigate and report on network traffic, security incidents and administrative modifications.
You must perform these initial configuration tasks either from the MGT interface, even if you do not plan to use this interface for your firewall management, or using a direct serial connection to the console port on the firewall.

By
default, you can access the PAN firewall web GUI (HTTPS) via the 192.168.1.1/24
IP address and using the default login account: admin / admin
To change
the Management IP address and other settings, go to Device > Setup >
Interfaces > Management.
In a
physical appliance, there's a dedicated out-of-band MGT interface
while a PA-VM uses a Management interface
for its remote HTTPS (web GUI) and SSH access.

To configure the Management Interface IP address, select IP Type:Static > type the IPv4 Address: 192.168.1.254> Netmask: 255.255.255.0 > Default Gateway: 192.168.1.10 > for Network Connectivity Services tick: HTTPS, SSH, Ping.

You can verify the Management interface via CLI command show interface management

To configure DNS on the PAN Firewall, go to Device > Setup > Services > click edit (gear icon).

You configure DNS for Dynamic Updates (Antivirus, WildFire, etc.) and for PAN-OS downloads. Under NTP tab, you can configure an NTP server IP address for synchronized date/time which is very important for logging threats and investigating Cybersecurity incidents.


Click Service Route Configuration (a hyperlink). By default, the PAN Firewall uses the Management Interface for Dynamic Updates and NTP.

If you need to enable a certain Service (HTTP, NTP, NetFlow, etc.) via another PAN Firewall interface, click Customize.

It's best
practice to upgrade the PAN firewall to the latest and stable version before
deploying in a production environment. Before performing the upgrade, you need to review first the Release Notes and follow the upgrade path for PAN OS 8.x
To check
the current PAN OS version, go to Dashboard > General Information >
Software Version (8.0.0)

You can also view the current PAN OS version under Device > Software. Notice the Currently Installed column has a check mark for Version 8.0.0

Click Check Now (at the bottom) to list down the latest PAN OS.

Notice
the latest PAN OS Release is 8.1.8 (as of this writing). Click
Release Notes (for 8.1.8).

Click Upgrade to PAN-OS 8.1

According to the PAN-OS 8.1 upgrade path and since we're on 8.0.0, we'll need to download and install the latest "preferred" PAN-OS 8.0 maintenance before upgrading to 8.1

Click Download. This will take several minutes depending on your Internet speed (via Management Interface).

I wasn't able to finish the download and according to the pop-up message Details, I need to Download the PAN-OS 8.1.0 base image first (no need to install).

I first downloaded PAN-OS 8.1.0

I downloaded again PAN-OS 8.1.8

The Install option is now available. Click Install.

It's best practice to create a backup of the current Running Config, go to Device > Setup > Operations > Export > Export named configuration snapshot

Choose Name: running-config.xml from the drop-down option > click OK.

It will download a copy of the running-config (.xml) to your machine. Notice the running-config (.xml) was downloaded (Download folder).

Click Install. There was a pop-up Warning that will ask you to review the PAN-OS 8.1.8 release notes and perform a backup of the PAN firewall configuration.

The PAN-OS 8.1.8 installation failed due to a content version requirement.

To update the PAN firewall Dynamic Updates (Antivirus, WildFire, etc.), go to Device > Dynamic Updates > Check Now to download new Dynamic Updates.


I've downloaded and installed the latest updates for Antivirus, Applications and Threats, GlobalProtect and WildFire.


For the Application and Threats Install, just click Continue Installation.


After the Dynamic Updates were installed, I was able to install the PAN-OS 8.1.8. A reboot is required afterwards. Click Yes to reboot.

I waited for several minutes but it kept on re-connecting to the device. I just opened a new web session and HTTPS again to the PAN Firewall.

A pop-up message will appear saying it's on PAN-OS 8.1

You can verify the current Software Version under Dashboard > Software Version (8.1.8)

Or under Device > Software. Notice 8.1.8 has a check mark under Currently Installed Column.

To configure Layer 3 interface in PAN firewall, go to Network > Interfaces > Ethernet > click a specific ethernet interface.

Select Interface Type: Layer3.

Under Config tab > Virtual Router > New.

Type a Virtual Router Name (VR-1) > click OK.

By default, there's a named Virtual Router called default under Network > Virtual Routers.


Type the Zone Name (outside) > click OK.


Under IPv4 tab > select Static > click Add.

Type the IPv4 address/netmask (203.0.113.20/24) > click OK.

Configure the ethernet interfaces for the inside and DMZ Security Zones according to the network topology. Notice the Link State are gray colored. You'll need to click Commit in order to apply the changes (Candidate Config) to the PAN Firewall's Running Config (a slight difference in the Cisco world).

Click Commit > you can optionally Preview Changes > select the number of Lines of Context > click OK > click Commit again.


You should see a pop-up window to Preview Changes or allow it in your web browser settings if it's being blocked.

The Preview Changes is color coded. Notice the changes for the ethernet interface were highlighted in yellow (Modified).

You can alternatively choose Change Summary option to have a quick look of the changes being made.

Click on Tasks (at the bottom right corner) to view the Status of the changes (Candidate Config) being Committed to the Running Config.

Notice the ethernet interfaces Link State are now green (active) after clicking Commit.

You can also verify via the CLI command show interface all or specify a specific ethernet interface.

To configure a static default route (for Data plane), go to Network > Virtual Router > click VR-1.

Go to Static Routes > IPv4 tab > Add.

Type a Name: STATIC-DEFAULT-ROUTE > Destination: 0.0.0.0/0 (a.k.a quad zero route) > Interface: ethernet1/1 > Next Hop: IP Address > 203.0.113.1 > click OK.

Click OK again > click Commit.


You can view the PAN firewall routing table under Network > Virtual Routers > VR-1 > More Runtime Stats (hyperlink on the far right column) > Routing > Route Table.


Or using the CLI command show routing route

I was able to ping Google DNS 8.8.8.8 (via Management Interface) but ping from the inside source IP 192.168.1.1 wasn't working. This is due to a NAT policy which isn't configured yet.

To configure the NAT policy, go to Policies tab > NAT > Add.

Under General > type a Name (INSIDE-DYNAMIC-NAT)

Go to Original Packet tab > Source Zone > click Add > choose inside.

Under Destination Zone > choose outside.

Go to Translated packet > choose Translation Type: Dynamic IP and Port (NAT overload or PAT in Cisco).

Choose Address Type: Interface Address

Choose Interface: ethernet1/1.

Type the Translated IP Address (203.0.113.20/24) > click OK.

Click Commit.


You also
need to configure Security Policies (ACL in Cisco) to permit traffic between
Security Zones which is under Policies > Security. By default, PAN Firewall has two
Security Policy:
intrazone-default:
Permit traffic in the same Security Zone
interzone-default:
Deny traffic between different Security Zones
It would be
practical to enable logging on these default Security Policy for
troubleshooting purpose.
Select
the Security Policy > Override (at the bottom) > go to Actions tab >
Log Setting > Log at Session End > click OK.

Enable logging (Log at Session End) for both intrazone-default and interzone-default Security Policy.

To create a new Security Policy, click Add > under General tab > type a Security Policy Name. Notice the tabs with the wriggly red mark are required fields.


Under Destination tab > Destination Zone > select outside.

Under Actions tab > Log Setting > tick Log at Session End.


After the Dynamic NAT (IP and port) policy and Security policy were configured, I was able to ping the Internet (Google DNS) sourced from the inside zone 192.16.1.1/24.

To view or monitor traffic, go to Monitor tab > Logs > Traffic. Notice there are traffic generated from inside source 192.168.1.20 to outside destination 8.8.8.8 and hit the Security policy rule SEC-POL-IN-OUT.

Click on the magnifying glass icon to view a more Detailed Log. You can also maximize the output to full screen by clicking the maximize icon on the upper right corner.

You can optionally create Tags (color code) for the Security Zones under Objects > Tags > Add. This is to help admins visually identify the Security Zones if there are multiple Security or NAT policy configured on the PAN firewall.

Select the Security Zone (outside) > choose a color (Red) > click OK.

Create tags for the inside and dmz Security Zones according to the network topology.

Click Commit.

Go to Policies > Security. Notice the Security Zones are now color coded (Tags) to make it easier to identify the Source and Destination Security Zones in troubleshooting a NAT and Security Policy.

Go to Policies > NAT. Notice there are Tags (colors) on the Security Zones.

No comments:
Post a Comment